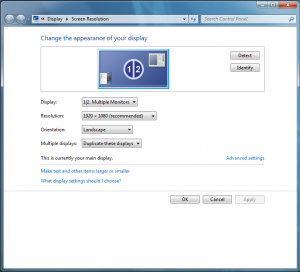
Presenting in the hall – Surface tablet

In order to try to make presenting in the hall a more slick process, we have bought a new Windows 8 Surface tablet which can connect wirelessly to the data projector.  The tablet is connected to the college network just like any other computer, and can access the same resources.  The only difference is that the Surface tablet runs Windows 8.1, where all of our other computers run Windows 7.  This is on purpose as Windows 8 provides a better touchscreen experience, which you’ll be able to take advantage of.

The tablet is stored and charged inside the audio/visual cabinet.  Because of this, its more important than ever to ensure the cabinet is locked up again once you have finished use the equipment.

Surface

Using the Surface tablet to present

  • Turn on the data projector and lower the screen in the same way as normal.  Ensure the amp is turned on as normal.
  • While the screen is lowering, turn on the Surface tablet and logon to it.  It can take about 30 seconds to fully logon to the tablet, during which time the screen remains blank.  This is normal, don’t worry.
  • Select the HDMI input button on the white projector control box.  The screen will show a ASUS MiraCast screen.
  • From the tablet swipe in from the right with your finger and tap DEVICES then tap PROJECT.  Select the MiraCast device.  The tablet will wirelessly connect to the projector at this point and you can display which ever

Tips

  • The Surface tablet connects to both the network and the projector wirelessly.  This gives you the freedom to locate it wherever you want.  Be that on the stage, the lectern, or carried around in your hands.
  • The Surface keyboard can be removed from the tablet.  Its magnetically attached and will disconnect with a slight pull.
  • Both video and audio are transmitted wirelessly.
  • The ‘WINKEY’ + ‘P’ key combination allows you to quickly and easily switch between Duplicate and Extended mode.  Depending on what you’re showing and how you wish to present, you might find one or the other better.

Remember to….

  • Put the Surface tablet back in the audio/visual cabinet when you’ve finished with it, making sure you connect the charge cable to it to make sure its fully charged for the next person to use.
  • Lock the audio/visual cabinet.  The Surface tablet is valuable.

TIP – Long logon time after power on

If you come to use a computer that is not turned on, the below will help you reduce the amount of waiting time.

When a computer turns on it presents the logon screen before it is really ready to be used.  For about 30 seconds to a minute after the logon screen is displayed (depending on the age and speed of the computer), the computer is still doing things in the background.  If you try to logon whilst these background task are being completed, it dramatically slows down the logon process.

You’ll find that it much quicker if you wait for one minute after the logon screen appears before you try to logon, that it takes if you logon straight away when presented with the logon screen.  The older the computer, the greater difference in these times it takes.

Understanding projecting to your whiteboard

Duplicate Mode
Since September 2014, the way that the projected image on the Whiteboards works has changed.  Before that point, in fact ever since we have had data projectors in college, they have always worked the same way.  That is, whatever is displayed on your screen was exactly duplicated through the projector onto the classroom whiteboard.  This, surprisingly enough, is referred to in Windows as Duplicate mode.

duplicate-vs-extended-01

Since September 2014, this has changed and now does not work the same way.  Below explains the background on the two issues which have required that we change the way the Whiteboards work, and then explains why the new method is better.

Issue 1 – Wide screen computers, none wide screen whiteboards
Even before September 2014 this duplication of monitor and whiteboard was starting to cause issues, and continues to do so.  The problem is that many (most) of the computers in college which are connected to the projectors are wide screen, 16:9 ratio.  However, all of the interactive whiteboards in the college are not wide screen, and instead are a more square 4:3 ratio.

When the image from the wide screen computer monitor is duplicated onto the non widescreen Whiteboard you end up with the black tram lines at the top and bottom of the image on the Whiteboard.  This means a significant percentage of the Whiteboard isn’t used and can make viewing the screen in a classroom difficult.  Some projector models manage this mis-match better than others, but all have the problem to some extent.

A replacement wide screen Interactive Whiteboard costs about £1,000 – £1,500, depending on size, so replacing the college Whiteboards with wide screen version is prohibitively expensive, certainly in the short to medium term.

Issue 2 – PowerPoint 2013
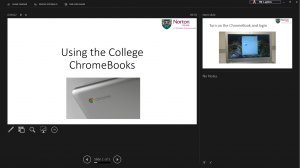
During the 2014 summer holidays we upgraded from Office 2010, to Office 2013 and while we did trail Office 2013 with a number of colleagues before rolling it out to all computers, one of the new features on PowerPoint 2013 took us by surprise.  When presenting a PowerPoint presentation, this new feature called ‘Presenter Mode’ allows staff to not just see what the students see on the Whiteboard, but also allows staff to also see any supporting slide notes and a thumbnail of the contents of the next slide.  Very useful.  The below image shows presenter mode (as seen my the member of staff on their monitor), with the currently displayed slide in the main left section and the thumbnail of the next slide in the top right. In this case there are no notes, but they would be displayed below the next slide thumbnail.

duplicate-vs-extended-02

The problem is that in order to show different content on the computer monitor than is on the whiteboard, the Duplicate Mode which we have always used no longer works and is instead changed to something called ‘Extended Mode’.

Extended Mode (The solution to issue 1 & 2)
Instead of simply duplicating the content, Extended Mode allows different content to be displayed on two ore more screens (be they monitors or projectors/whiteboards).  It also allows content to be moved between those screens.

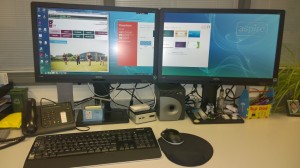
The image below shows my computer, which has two monitors, using Extended Mode.  On the left hand monitor you can see I have the College website open.  I also have PowerPoint open and am starting to drag the PowerPoint application from the left hand (primary) monitor, onto the right hand monitor.  You can see how it is currently spanning both monitors as I’m moving it from left to right. This is what Extended Mode does – it allows the primary monitor (in a classroom, normally the staff PC) to be extended onto the secondary monitor (in a classroom, normally the Whiteboard) and content to be moved easily between them both.

duplicate-vs-extended-03

Extended Mode differs from Duplicate Mode by being able to cope with differing screen sizes (16:9 or 4:3).  This means that no tram lines are shown at the top and bottom of the Whiteboard as you get with Duplicate Mode.  This makes viewing the Whiteboard much easier for students.  It also allows for staff to have one thing on the screen for the students to access, but to be able to work and prepare something else on the computer monitor.

Conclusion
As Extended Mode resolves the issue of allowing PowerPoint 2013 to use the new Presenter Mode and the issue of differing display sizes, this is how staff should start to use the computers and Whiteboards in classrooms.  When using PowerPoint, embrace the new Presenter Mode, it provides you with useful information, particularly if you start to add notes to your slides.  When not using PowerPoint, simply move the content you wish the students to see from your monitor, onto the Whiteboard behind you.

While Extended Mode takes some initial getting used to (moving the mouse off the edge of your screen onto the Whiteboard behind you takes some getting used to), once you are you’ll find that it is a much better way of working.

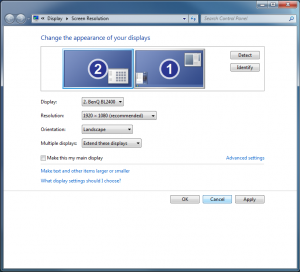
Tip (Left and Right, 1 and 2)
By default the computer will assume that the primary display (your monitor) is to the left of the secondary display (your Whiteboard).  And so when you move content from primary display to secondary display (left to right) and then back from secondary to primary (right to left) it all moves in a logical way.

duplicate-vs-extended-05


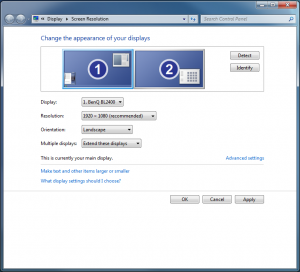
However, depending on the layout of your classroom, your computer might be to the right of your Whiteboard and you need to tell the computer this.  To do so is easy.  Right click on the desktop and choose SCREEN RESOLUTION and simply drag and drop the graphical representations of your two display so they reverse positions.  APPLY and OK and when you drag content in the direction of your Whiteboard, the content moves in a logical way.

duplicate-vs-extended-04


Office Online – Editing uploaded documents

With more documents being uploaded onto our portal sites and private OneDrive folders, there is now an increasing need to edit those uploaded documents.  Doing so is fairly easy and takes advantage of the fact Microsoft have versions of Word, Excel, PowerPoint and OneNote that run within a browser.  These apps are called Office Online, and are very useful and increasingly full featured and powerful tools.

Below are the steps to using Office Online to edit documents (in this case from OneDrive, although the same principle works on the portal).

Step 1
Navigate to the online location where the uploaded document is stored, in this case SLs OneDrive folder.  We’re going to edit the online Word Document called ‘Document’.

edit-web-office-01

Step 2
Tick the box to the right to select the document you wish to edit, click on the ‘…’ menu button.  A window will open, showing a preview of the document you’re about to edit.  Once again click on the ‘…’ icon on this window and select EDIT IN BROWSER.

edit-web-office-02

Step 3
The uploaded document will open in the appropriate applications (Word, Excel, PowerPoint or OneNote) on Office Online.  Documents can be edited in the same way as using the full desktop version of the application.

edit-web-office-03

Step 4
Once you have finished editing your document, there is no SAVE button on Office Online.  Instead it auto saves when you exit it.  To exit Office online, simply click on the folder name located in the top left corner, next to the Office Online title.

edit-web-office-04

File Attachments on Office 365 email

Microsoft have recently updated their Office 365 email software, with a greater emphasis on the use of their cloud based OneDrive folder.  The below is the updated method to attaching a document from your My Documents folder, or other location on the network.

Step 1
Create your new email, or reply to an existing email as normal.

o365-1

Step 2
From the INSERT menu, choose ATTACHMENTS OR ONEDRIVE FILES.

o365-2

Step 3
The default location to insert a document from has now been changed to OneDrive, but to add a document from your My Documents or other Network location click on the COMPUTER icon and the normal browse window will open.  From here you can browse to whatever location and files as normal.

o365-3

Step 4
Because Microsoft really want you to start using OneDrive, you’ll be asked if you want to UPLOAD AND SHARE WITH ONEDRIVE or SEND AS ATTACHMENT.  To attach a file as normal, simply select the latter.

o365-4

The UPLOAD AND SHARE WITH ONEDRIVE option is a very useful tool to use, but may require some training to get the most from it.  For now, you can ignore it.

Remote Access on Windows

Using Remote Access—Windows 7, 8 and 10

Remote access allows you to connect to the college network from home and access the college network as if you were at college.

When using Remote Access for the first time, or if your computer has recently upgraded to Windows 10, follow the instructions below.

Step 1

Open up Internet Explorer and logon to RM Unify and click on the remote access icon.  Remember, RM Unify can be accessed via the college website.

win-ra1

Step 2
The first time you use remote access you’ll be prompted to install an add-on.  Click on the ‘Allow’ to do so.  You need to do this or it won’t work.

win-ra2

Step 3
When prompted enter your network username and password and click on SIGN IN.  Remember to type ‘norton\’ before your username (as shown in the image to the left)For example norton\sl


win-ra3

Step 4a
The first time you use remote access you’ll be prompted with a confusing message stating your browser is not supported.  Assuming you’re running Internet Explorer 11, don’t worry, you’re not.

win-r4a


Step 4b
Click on the cog (settings) icon, then click on Compatibility View Settings.  Next click on Add.  This will add n-yorks.sch.uk into the list.  Once done, click on Close. You’ll not need to perform this step again.

win-ra4b

Step 5
The main Remote Access screen will now load.  Depending on what applications have been made available, you may see more or fewer icons as is shown in this example.  The important icon is the Remote Desktop icon.  Click it.

win-ra5

Step 6
An information box will appear.  Click on CONNECT.

win-ra6

Step 7
If prompted about the identity of the Remote Computer, click OK.

win-ra7

Step 8
You’ll then be presented with network screen with an icon with your username on it.  Click on it and enter your password one last time.  You’ll now have a desktop just as if you’re in college.

win-ra8