Windows 10 – ‘Start Search’ and ‘Pin to Taskbar’

This post will guide you through using the Start Menu to find applications that are installed onto the computer, and then ‘pin’ them to your Taskbar so they are more conveniently accessible for the next time you need to use them.

Clicking on the Start button, then clicking on All Apps shows all of the applications installed on your computer, listed alphabetically.  It can sometimes difficult to find what you’re looking for in this section if there are a large number of applications installed.

StartMenu1

There is a feature called Start Search which helps you find applications on the computer.  Simply click on the Start button and immediately start typing the name of the application you wish to use.  You can then run that application.

StartSeach2

However, it may be that you use this application frequently and want a quick way of accessing it.  It is possible to ‘pin’ multiple icons to the black Taskbar (on the bottom of Windows), which allows you to create your own custom list of applications you use frequently.  Once you have used Start Search to find your application, right click on it and select ‘Pin to Taskbar’.

StartSearch1

Icons pinned to the Taskbar remain accessible at all times.  Icons can be dragged and ordered as required.

Taskbar

Also, certain applications that have their icons pinned to the Taskbar support ‘Jump lists’.  In the example below, right clicking on the icon for Excel displays the list of recently accessed Sheets created in Excel, which can then be directly opened from the Jump List.

Taskbar2

Office 365 – Class Groups

Office 365 Groups – Overview

Office 365 Groups are platforms for groups of people to collaborate and share ideas on. Features of the groups include creating share document libraries, calendars, conversations, notebooks and planners, all of which are available to anyone who is a member of that group.

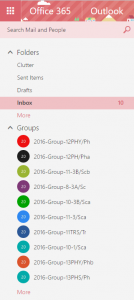
Office 365 is now linked to SIMS, and so this allows us to create groups based around teaching classes.  The image below shows an example of a member of staffs Office 365 account, with groups for each of their teaching classes.

O365 Groups 01

Teachers are set up as the owners of the group, to which they have the ability to add new content to, or able to start discussions within the group.  Students who are taught in that class are added as members of the group and can contribute to anything the teacher creates or starts.

As SIMS knows which classes a teacher will teach and which students are in each class, and because Office 365 is linked to SIMS, it ensures that Office 365 group membership will remain accurate, with no interaction from staff needed.

Office 365 Groups – Usage

By clicking on one of your class groups from the list on the left hand column, it displays the contents of that group in the main section.

O365 Groups 03

In the top right corner of each group an indicator shows the numbers of students within that group.  Clicking on the text expands this, showing a list of all of the students names in this class.  This is a useful display, as it allows you to double check that all of the students in your class are members of the group.

O365 Groups 02

When a class group is selected is displays the feature headings (Conversations, Files, Calendars, Notebook, Planner and Site) for that group.  Clicking on any of this headings opens those features for use.

Office 365 Groups – Conversations

Conversations allow the class to participate in text based chats.  This works in the same way as most other chat programs such as Facebook Messenger or iMessage, but is also email based, so everyone in the group receives an email when new content is added.  This might be desirable, but also might become a little overbearing so it’s possible to turn off the email alerts so the sender of the message doesn’t receive an email.  This is changed via the settings cog as per the picture below.

O365 Groups 04


Office 365 – Using distribution Groups for the first time

It is not always immediately obvious how to send an email to a Distribution Group for the first time.  The below explains how to do so, using the example of sending an email to the All Staff Distribution group.

1) Create a new blank email in the normal way.

email_list_1

2) Click on the TO: button to open up the Address book.

email_list_2

3) Click on the >> icon to open up the different directories.

email_list_3

4)  Click on ALL DISTRIBUTION LISTS and find the email group you wish to send to.

email_list_4

5) Once you find the group you wish to send to, click on the + icon next to the email group.  Then click SAVE.

email_list_5

6)  The email Distribution group will now be added to the TO: line of your new email and you can proceed as normal.

email_list_6

From now on, subsequent re-uses of this email group can be accessed by just typing a few characters of its name into the TO: field.

College Calendar

Every member of staff have their own private Calendar as part of Office 365 which can be accessed via the menu icon.

O365 Menu

The College also publishes its whole staff shared Calendar in Office 365.

cala

All staff are sent an email invitation to access this shared email.  Once this is accepted, the shared calendar can be set to overlay the whole staff shared calendar over the top of your own, to aid in planning.

If you can’t find this email invitation, below explains how to easily add the shared calendar yourself.

1.  Open your Calendar from the menu and then right click on the MY CALENDAR text and select OPEN CALENDAR from the menu.

cal2

2.  Type the word “Calendar” into the “From Directory” search box and click “Search Directory

cal3

3. The “College Calendar” with the College shield should appear.  Select this calendar.

cal4

4.  Press the OPEN button to share the calendar with you.

cal5

5. You can toggle the shared calendar on and off by selecting and de-selecting it from the list in My Calendars.

cal6

Windows 10 – Overview

The College has begun testing Windows 10 on the College network.  Below are some of the differences (and similarities) that you will notice when your computer is moved to Windows 10 .

1) New Logon Screen

Windows 10 introduces an updated logon screen, but works in exactly the same way as the Windows 7 logon screen.

Information about the computer and its connectivity status can be found in the top right. Power and reset options can be found in the bottom right.

Win 10a

2) Same Desktop experience

Windows 10 retains the same desktop background and desktop icons which you’re used to from Windows 7.

Win 10b

3) New Start Menu

Windows 10 introduces a vastly updated and different looking Start Menu.

The key differences are the inclusion of the built in Apps for News, Weather etc.   At the moment, some of these Apps are currently disabled.

Win 10c

4) New “All Apps” menu

Where Windows 7 had the All Programs section, which listed all of the Program Sets (folders) and grouped and contained the applications together, Windows 10 has the All Apps section. This works in the same way, and clicking on this lists the Program Sets and applications in alphabetical order.

Win 10d

5) My Documents and Shared Areas

Accessing your My Documents is easiest done via the “My Work” icon, which is found at the very top left of your desktop, but can also be accessed via File Explorer icon.

The shared areas (K: drive etc) can be accessed via the File Explorer icon, which fulfils the same function as the Computer link on a Windows 7 computer.

Win 10e

6) Logging Off

The logoff button can now be found at the top left of the Start Menu by clicking on your name, then selecting Sign Out.

Win 10f

BYOD – Security certificates

As per the Colleges eSafety policy all access to the Internet is filtered, monitored and logged.  As part of that monitoring any secure (https) websites that are accessed are decrypted, scanned and then re-encrypted to ensure that they conform to the Colleges eSafety policy.  No private information is read, the contents are just scanned by the server and checked against the College filtering lists.

Most modern web browsers and devices are now aware of when this happens to them.  This interception of secure traffic is a sometimes used as a method by hackers and malware to steal personal information or infect computers, and so your device may display a message, similar to the image below warning you that this is trying to occur.

mitm

To stop your device from displaying this message, you need to install what’s called a Security Certificate to your personal device.  This tells your device to trust the Norton College Internet servers.

NOTE: NOT INSTALLING THIS CERTIFICATE DOESN’T STOP THE COLLEGES INTERNET FILTERING FROM WORKING ON YOUR DEVICE, IT JUST MEANS YOUR DEVICE WILL CONTINUE TO SHOW WARNING MESSAGES.

You only need to install the security certificate to each of your BYOD devices once, and to do so follow the steps below.

Step 1
On your device, open up RM Unify and click on the BYOD Certificate tile.

mitm1

Step 2
A new page will open.  Read the information at the top of the page.

mitm2

Step 3
Based upon the type of BYOD device you’re using, click on arrow next to your device type.  Read and follow the instructions you are provided.

mitm3

Please ask IT Support if you require any further assistance installing the certificate, or further clarity on what it is you’re installing to your device.


OneDrive Video

One of the features of Microsoft Office 365 is the Video feature.  The feature allows the College to have its own private online Video store, very much like a private YouTube.

Because these videos are store on the Internet, in Office 365, they can be accessed and watched on most devices, including the College ChromeBooks.

This help guide will be split into two section, viewing content on Office 365 Video, and uploading content to Office 365 Video.

Viewing Office 365 Videos

1. From the Office 365 menu, select the VIDEO tile.

OneDrive Video 1

2. An initial welcome screen may appear, but you’ll then be shown the Office 365 Video homepage.  This shows a list of the most commonly watched videos in our Video library.

OneDrive Video 2

3.  The library is split up into Channels.  Each channel will represent a different subject.  Click on a channel to view all of the videos in that channel.

OneDrive Video 3

4. All of the videos in that channel are shown.

OneDrive Video 4

5.  To watch a video, simply click on the video you wish to watch.

OneDrive Video 6

6.  It’s possible to search for a video based upon its name, either searching the whole Video collection, or just in a specific channel.  To do this, simply click on the magnifying glass in the top left corner to open up the search box, type what you’re looking for and then click on the magnifying glass again.  The results of your search are listed.

OneDrive Video 5

Uploading Contact to Office 365 Video.

Coming soon….

Chromebook Tip – Using OneDrive for the first time

The first time that you use Office 365 and the Microsoft Office Web Apps on a Chromebook, be sure to first access OneDrive BEFORE you try to create a new online Office document.

Occasionally if you try to create a new Microsoft Office online document, before you’ve access OneDrive at least once, you may run into problems doing so.  This is because occasionally OneDrive (the place where your Office document is trying to create itself in) is not yet ready to be used.

To be sure everything is going to ‘just work’, open OneDrive by clicking on the menu button and then click on ONEDRIVE.

OneDrive menu

If everything is fine OneDrive will open without any issues.

If you see a message like the one below, click on the OneDrive for Business button and, if asked, sign into this with your College email address and password.

OneDrive Sign-in

OneDrive and the Microsoft Office Online web apps will load correctly. You only need to do this once.

ChromeBooks – Internet Filtering

In terms of Internet filtering, the College ChromeBooks need to work differently to how the Windows computers work.  This is because you log onto a Chromebook with a Google Chrome account, and not a College network account.

As our Smoothwall filtering system doesn’t recognise this Google account in the same way as it would a Windows account, it assigns a baseline level of Internet filtering to you.  This may prevent you accessing some sites on a Chromebook that would otherwise be accessible to you on a Windows computer.

To ensure you receive the right level of Internet filtering when using a Chromebook, follow the steps below.  You will only need to follow these steps once.

1)  When you logon to a Chromebook, click on the second tab in Chrome.  A Smoothwall Authentication with Google is shown.  Click on the red G+ Sign in button in the top right corner of the page.

sw_google1

2)  A new Request for Permission window opens.  Click on the blue Allow button.

sw_google2

3)  A confirmation page is then shown, confirming the process is complete and you’ll now receive the same level of filtering on the ChromeBooks as on a Windows PC.

sw_google3


ChromeBooks – Printing

The ChromeBooks print to the same FollowYou print system to which the Windows PCs do.  Printing from a Chromebook and releasing your printout from the College printers is a very similar process to doing so on a College Windows PC.

From the Chrome menu, select PRINT.

ChromeBook Print 3

The Chrome Print dialogue menu will appear.  Click on the CHANGE button, to choose a printer to print to.

ChromeBook Print 1

The list of currently available printers will be listed.  The first time you try to print this list will likely be blank and you’ll be offered access to two shared printers.  Accept both of these.

Selecting FollowYou Mono will send your print job in black and white.  Selecting FollowYou Colour allows you to choose colour as a print option before sending the job.  As with the Windows PCs, anything not specifically requested as colour job will be sent as a mono job.

ChromeBook Print 2

Once you’ve chosen your desire printer click on the blue print button and your job will be sent to the College print system.

ChromeBook Print 4

To collect your print job from a College printer, login to the printer using your Print/ID card, or be using your College network username and password if you don’t have a card, in the same way as if you were collecting a print job set from a College Windows PC.