OneDrive and Office Web Apps

This article describes what OneDrive and the Office Web Apps are.  It explains how to create and store (save) Office Web Documents, how they can be shared with others and how shared documents can be simultaneously worked on by multiple people.  Finally it talks about OneDrive and how existing Office documents can be uploaded to it to be edited with the Office Web Apps.

What are the Office Web Apps?
As part of the Office 365 platform we use in College, Microsoft provide copies of Word, Excel, PowerPoint and OneNote that run on the Internet, and not from the computer you happen to be using.  While not exact copies of the full Microsoft Office 2013 applications, these Web App versions have the most commonly used features that people will need.

What is OneDrive?
OneDrive is your private location on the Internet where your documents created using the Office Web Apps are saved and stored.  You can also upload other types of documents to OneDrive, such as images and .pdf files.

How to create an Office Web App document
Log onto your College Office 365 account by clicking on the email link on RM Unify.  In the top left corner, click on the menu icon (highlight in red on the image below).

onedrivewebapps1

The menu provides a list of the various components that make up the full Office 365 suite, amongst them you’ll see the ability to open Word, Excel, PowerPoint and OneNote.  Click on which ever application you wish to use.  In this instance, I’ll choose Word.

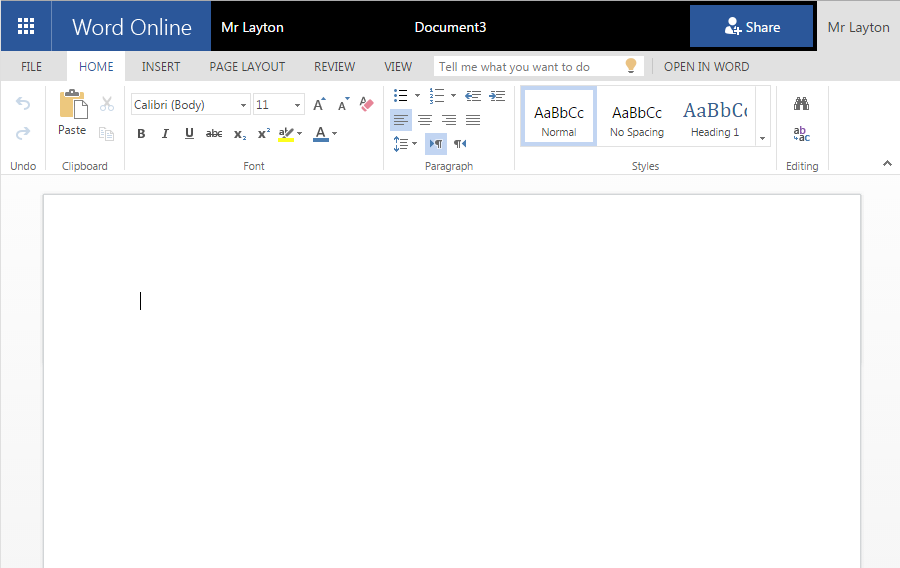
When you launch the Web App, you’re given the opportunity to create a new document from a blank page, or from some of the pre-defined templates.  You also have the option of opening any of your recently created documents.

onedrivewebapps2

There is no traditional ‘SAVE‘ or ‘SAVE AS‘ buttons when using any of the Office Web Apps.  They automatically save to your OneDrive folder as you work on them.  By default they save as the Document1, Sheet1 or Presentation1 files names, depending on whether you’re using Word, Excel or PowerPoint.  At any stage you can rename your document by clicking on the document name in the black header, and typing a new name.

onedrivewebapps3

To close you document simply click on your name, which also located on the top black bar.  This takes you to your OneDrive folder.

Opening a previously saved document
To continue working on a previously created document, simply open your OneDrive folder by selecting it from the Office 365 menu.  You’ll see all of your previously created documents.  Single click on the document you wish to work on.  By default documents will open in a read only mode.  To continue editing the document, click on the EDIT DOCUMENT, found at the top of the document, and select EDIT IN WORD ONLINE.  The document will become editable.

onedrivewebapps6

How to share a document stored on OneDrive
Sharing one of your own documents with other people is easy with OneDrive and Office Web Apps.  At the top of each of the Office Web Apps there is a prominent SHARE button, click it.

In the top most box, search for the person you wish to share your document with.  You can use their forename, surname or email address to help you do this.  You share a document with multiple people.  Importantly you need to decide if you wish to give the person you’re sharing your document with either read access, or the ability to edit your document via the drop down menu.  You can also add an option personal message to the person/people you’re sharing with.  Click on the blue share button to share the document.  The recipients are sent an email stating the document has been shared with them, with a link to the document on it.  You’re also sent an email to confirm you’ve shared the document.

onedrivewebapps4

How to open a document that has been shared with you.
Once a document has been shared with you, it will appear in the SHARED WITH ME section of your OneDrive folder.

onedrivewebapps5


Printing Masterclass – Print from an Apple IOS device

The College printing system now allows staff and students to print from their BYOD Apple IOS devices (iPhone & iPad).  The process makes use of the standard built in Apple AirPrint technology, and if you’ve used Apple AirPrint at home the process is almost identical.  Any feature of IOS, or any App that supports AirPrint, can be used with the College print system.

All printing done via Apple AirPrint is logged, audited and charged in the same way as if your were printing from a normal College computer.  You must be connected to the NORTON – BYOD Wi-Fi network to allow your Apple IOS device to see the College print system.

Step 1
In the help guide I am going to send the BBC website homepage to print system.IOS Print 1

Step 2
Tap on the SEND TO button to open the options menu.  locate the PRINT option and tap on it.
IOS Print 2

Step 3
The print menu will appear.  If you have never printed from your IOS device before, the PRINTER menu line will say SELECT PRINTER.  Tap this.

IOS Print 3

Step 4
When printing, there are two offered printers, COLOUR MOBILE PRINT and BLACK AND WHILE MOBILE PRINT.  Choose which printer you wish to use depending on your needs.

IOS Print 4

Step 5
This is the only step than may differ from the way AirPrint might work and home, and how it works in College.  If you have never used the selected printer, you’ll be prompted for a username and password.  Enter your normal College network username and password and tap OK.  This is how the College print system knows whose FollowYou print queue to route the job to.

IOS Print 6

Step 6
Finally tap the PRINT button and your print job will be sent to the College print system.

IOS Print 7


Printing Masterclass – email to print

It is now possible for staff or students to send an email from your College email account to the College print system.  The below describes how you can do this, and what can be sent.  As this is simply using email, the below will work from both in College, or at home.

What can you send?
As well as the actual body of the email itself, you can send Microsoft Word, Publisher, PowerPoint and Excel documents as attachments.  You can also send Adobe Acrobat documents and most types of images.

MS Word MS Publisher MS PowerPoint MS Excel PDF Images

How do you send them?
From your Norton College email account simply create a new email, or forward an existing email, to either:

norton-bw@nortoncollege.net
or
norton-colour@nortoncollege.net

As the email addresses indicates, this will send the document as either a mono print job or a colour print job.  Please note the process only works if you use your College email account.  Anything sent from a 3rd party email address is discarded by the system.

What happens next?
Depending on the type, size and number of attachments you’re sending, it might take a few seconds or a few minutes for the system to process your request.  Once it has done, you’ll be sent an email stating you can collect your job from a printer.  You do this in the normal way, just as if you’d sent

Does the same department (or Post 16 student) charging apply when using this system?
Yes.


Scanning Masterclass – Convert a paper document into a Word Document

The College printing system has the ability to take a paper based document, scan it and convert it to a editable Word document.  This post explains how to do this.

1.  First, logon to one of the floor standing printers (not the table standing devices in the IT Suites).  From the first menu, select SCAN.

ScanToWordDoc1

2.  From the SCAN menu, select MY FOLDER. While all three options allow you to scan, this is only option that offers the ability to scan to Word.  Scan to MY FOLDER saves the scanned document to your network My Documents folder.

ScanToWordDoc2

3.  Tap on the DELIVERY FORMAT button to change from the default .PDF format.

ScanToWordDoc3

4.  As you’ll see, there are a number of formats you can choose to use.  For this exercise, locate and select WORD (.DOCX) – TRUE PAGE on page 3, then press OK.

ScanToWordDoc4

5.  Your Delivery Format is confirmed.  Press NEXT to continue.

ScanToWordDoc5

6.  As with any scanning, don’t forget to tap SCAN SETTINGS to scan, as the default is to scan in mono and at a low resolution.

ScanToWordDoc6

7.  Change from TYPE (BLACK & WHITE) to TYPE (FULL COLOUR) and change RESOLUTION (200DPI) to RESOLUTION 400DPI).  These settings are a good balance between quality and file size.  Press DONE to be taken back to the previous menu.

ScanToWordDoc8

8.   Press the SCAN button to have your paper document scanned and converted to an editable Word Document which is now saved in your My Documents folder.  Don’t forget to log off the copier!

ScanToWordDoc6

About the Trips & Visits phones

The College has two mobile phones which can be accessed by staff who are taking students out of College on trips or visits.  Below will give information on the phones, how they should be booked and where in the world they will work.

610fKZOB9QL__SY679_ 61HRva0u4pL__SL1500_

About the phones

Both Phones are Nokia Lumia 630 devices, running Windows Phone.  Both phones typically get about a day worth of charge with normal use (this is fairly normal for smart phones).

Nokia Lumia 630 Green

  • Telephone number: 07793146296
  • Email Address: NortonTripsGreen@outlook.com
  • Password: Contact IT Support

Nokia Lumia 630 Orange

  • Telephone number: 07599740300
  • Email Address: NortonTripsOrange@outlook.com
  • Password: Contact IT Support

Booking the phones

Staff should book the phones well in advance of the trip using the normal College online resource booking system https://nortoncollege.roombookingsystem.co.uk/.  In addition, please also book the day before your trip to enable you to ensure you’re familiar with the phones workings and you can ensure the phone is charged prior to you leaving.

Portable battery chargers for the phones

We have also recently purchased two portable batteries which can be used on the go to re-charge the two phones.  They are ideal for re-charging the phones in case you need the phones in use longer than a day, for instance travelling to and from a European destination.  These can also be booked on the normal Online Booking system, and like the phones should also be booked for the day before travel to ensure they can be fully charged and you know how to use them.

Nokia DC-19

Adding Parent contacts to the phone

For certain trips/visits it’s likely that you’ll wish to have parental contact telephone numbers stored in the phone.  As these are Windows Phones, and linked to a Microsoft email address, this process is made fairly easy.  Staff simply need to login to https://people.live.com/ with the phones unique email address and password.  Addresses which are added to this list will automatically sync to the phone.  It is for the member of staff running the trip to ensure that the correct details are entered.

Removing Parent contacts to the phone

Once you return from the trip, and before returning the phone to IT Support, you should ensure you remove the parental contact telephone numbers from the phone by logging into the phones email account and deleting the parents you added.

Costs/calls/texts and Internet usage (UK)

The phones are primarily provided to enable staff to make or receive emergency calls.  As such, staff do not need to worry about the costs involved in using the phones in these situations.  However, it is worth noting that, when used in the UK, that both phones can make unlimited UK landline calls and texts and have 1Gb of data attached to them.  The data limit is ideal if you wish to install Twitter or Flickr Apps on the phones to enable you to tweet or add photos to the College Flickr account when you’re out and about.

Costs/calls/texts and Internet usage (EU)

Both phones can be used in mainland Europe, in the countries the College normally has trips in (France/Germany/Italy/Spain and others).  As noted above, staff should not concern themselves with the cost of using the phones in the EU, as they are there for emergencies.  However, we do also have the ability to use limited data when abroad for non-emergencies.  If data (Internet/Apps) is used in the EU, the College is charged £1.66 per 50Mb of data.  Obviously, it is better to use data when you’re attached to Wi-Fi (say in the hotel), so please try to do so.

Twitter and Flickr Apps

The College has both Twitter and Flickr accounts, which can be used on the phones.  It may be that you might like to use these Apps to keep parents up to date with what you and the students are doing during the trip.  Please be mindful that some students may be on the list who should not have photos put online.  As normal, the office keep a list of these students.  If you feel you’d like to use Twitter and/or Flickr on your trip, please ask IT Support for the usernames and passwords (if you don’t have them).


Doc-Q-Ticket

Doc-Q-Ticket allows staff to send any print job directly to the Reprographics department work queue, to be printed out in the print room for you.

Doc-Q-Ticket replaces the old method of emailing documents to the repro@nortoncollege.net address.

Sending a job to Doc-Q-Ticket

On all staff computers you’ll find a printer called REPROGRAPHICS.  Printing something to the Reprographics printer sends it to the Reprographics department to be printed for you.  As such, this is best suited for bulk requirements.  Any software that can print, can send a job to Reprographics through Doc-Q-Ticket.

Repro_printer

Configuring your request

When you print to the Reporgraphics printer it opens up the Doc-Q-Ticket program.   This allows you to specify certain details about your request.

The first page allows you to confirm your personal details (Name and email address) as well as confirming the required completion date.  It also allows you to add any notes with special instructions.

docqticket1

The second tab, JOB OPTIONS, is all about configuring your job.  This allows you to specify quantity, mono or colour and what type of paper you wish your job to be produced on.  You’ll notice that, as you build up your job, Doc-Q-Ticket keeps a running total of what the total cost of that job will be.  So, for instance, you can compare the cost of your job printed in colour against the cost of it printed in mono.

docqticket2

Once you’re happy with your job, tick the two boxes relating to copyright and confirming you’re happy with the details you’ve submitted and finally click OK.  Your job has been sent to Reprographics.

What happens next?

Once you send your job, it’s added to the Reprographics queue and will be released as quickly as possible.  Jobs will be released in order, based on the date required.  Once your job has been completed, you’ll be sent an email confirming its ready to collect.

ChromeBooks Q&A

What are ChromeBooks?

ChromeBooks are typically laptop style computers which, instead of running Microsoft Windows, run the simpler, streamlined Google Chrome software.  ChromeBooks don’t run the traditional software packages such as Adobe Photoshop or Microsoft office which our Windows PCs do.  Instead they run a version of the Google Chrome web browser, allowing users to access all of the web based resources on the Internet.

What are the strengths of ChromeBooks?

The Google Chrome software is much simpler that Microsoft Windows, making it much faster to boot and logon to than many of our Windows PCs.  They are cost effective, meaning we can buy two or three ChromeBooks for a traditional Windows Laptop.

What are the downside of ChromeBooks?

Compatibility.  Because they don’t run Windows, many of the peripherals you may have at home such as printers and scanners might not work with the ChromeBooks.   However, most new higher end printers are compatible with ChromeBooks.

How do I log onto a ChromeBook?

Rather than a College network account, you log onto a ChromeBook with a Google account.  All staff and students have had a Norton College Google account created for them, based on the format username@nortononchrome.org, where username is the same as your College network account.  Once you’re ready to start using your Google account, a password will be emailed to you.


Free Microsoft Office for Staff and Students

As part of our Microsoft licencing agreement, staff and students are entitled to install Microsoft Office on up to 5 home computers and devices.

What is included with the Office 365 ProPlus benefit?

Staff can now install the following 5 copies on any machine additively on 5 tablets of their choice.

  • Office 2016 Professional Plus
  • Office 2016 for Mac  (and new Office for Mac when it comes out next year)
  • Office for iPad (full featured)
  • Office for iPhone (full featured)
  • Office for Android tablet (when it comes available)

Requirements

Before you begin, make sure the computer or device is compatible.

  • Windows.  Windows 7, 8.1, or 10
  • Apple OSX.  OSX 10.5.8 (Leopard)
  • Apple IOS (iPad/iPhone).  IOS7 or above

*If you have an older version of Windows, you can download and install the Office 2010 version instead.

How to install Microsoft Office on a Windows or Apple iMac computer.

  1. Logon to your college email.
  2. Click on the COG icon (Settings) in the top right and then choose Office 365 Settings.
  3. A new page will open.  Click on the INSTALL STATUS tab.
  4. Click on the INSTALL DESKTOP APPLICATIONS text.
  5. The Office download and install page is loaded.proplus
  6. Click on the INSTALL button and follow the on screen instructions.

How to install Microsoft Office on an Apple IOS or Android device

  1. From the Apple or Android Play App store locate and download the individual apps for Word, Excel and PowerPoint.
  2. Once downloaded, run one of the applications and sign into it with your College email address and password.  If prompted, select ‘Work account’.

Presenting in the hall – Surface tablet

In order to try to make presenting in the hall a more slick process, we have bought a new Windows 8 Surface tablet which can connect wirelessly to the data projector.  The tablet is connected to the college network just like any other computer, and can access the same resources.  The only difference is that the Surface tablet runs Windows 8.1, where all of our other computers run Windows 7.  This is on purpose as Windows 8 provides a better touchscreen experience, which you’ll be able to take advantage of.

The tablet is stored and charged inside the audio/visual cabinet.  Because of this, its more important than ever to ensure the cabinet is locked up again once you have finished use the equipment.

Surface

Using the Surface tablet to present

  • Turn on the data projector and lower the screen in the same way as normal.  Ensure the amp is turned on as normal.
  • While the screen is lowering, turn on the Surface tablet and logon to it.  It can take about 30 seconds to fully logon to the tablet, during which time the screen remains blank.  This is normal, don’t worry.
  • Select the HDMI input button on the white projector control box.  The screen will show a ASUS MiraCast screen.
  • From the tablet swipe in from the right with your finger and tap DEVICES then tap PROJECT.  Select the MiraCast device.  The tablet will wirelessly connect to the projector at this point and you can display which ever

Tips

  • The Surface tablet connects to both the network and the projector wirelessly.  This gives you the freedom to locate it wherever you want.  Be that on the stage, the lectern, or carried around in your hands.
  • The Surface keyboard can be removed from the tablet.  Its magnetically attached and will disconnect with a slight pull.
  • Both video and audio are transmitted wirelessly.
  • The ‘WINKEY’ + ‘P’ key combination allows you to quickly and easily switch between Duplicate and Extended mode.  Depending on what you’re showing and how you wish to present, you might find one or the other better.

Remember to….

  • Put the Surface tablet back in the audio/visual cabinet when you’ve finished with it, making sure you connect the charge cable to it to make sure its fully charged for the next person to use.
  • Lock the audio/visual cabinet.  The Surface tablet is valuable.

TIP – Long logon time after power on

If you come to use a computer that is not turned on, the below will help you reduce the amount of waiting time.

When a computer turns on it presents the logon screen before it is really ready to be used.  For about 30 seconds to a minute after the logon screen is displayed (depending on the age and speed of the computer), the computer is still doing things in the background.  If you try to logon whilst these background task are being completed, it dramatically slows down the logon process.

You’ll find that it much quicker if you wait for one minute after the logon screen appears before you try to logon, that it takes if you logon straight away when presented with the logon screen.  The older the computer, the greater difference in these times it takes.